Video Production
 Digital Video can be a powerful resource for learning as it helps students develop visual, information and digital literacies. Engaging students in the production of digital stories or other video genres can captivate and motivate students to learn more in-depth about the subjects they study. It also promotes collaborative learning, creative expression, individual reflection, higher-order thinking skills, and other fundamental skills cited in the ISTE-S as being necessary to thrive in modern times.
The Purpose
The purpose of this assignment is to engage you in the creative video development process. Based upon your choice, you will be able to experience this developmental process from either a teacher's viewpoint or from the viewpoint of your students.
By creating the projects, you will be able to:
- Model effective use of video editing tools to support students learning.
- Plan your work and work to your plan
- Devise a plan for your project through group consultation and individual evaluation.
- Write a script that addresses the objectives stated in your planned unit.
- Create a storyboard that organizes and aligns the sequence of visuals, narration, and other video elements.
- Create original works or responsibly repurpose or remix digital resources into new creations to support students learning.
- Demonstrate a respect for the copy rights and obligations of using and sharing intellectual property.
The project is aligned with
- ISTE Standards for Educators: 3b c, 5b c, 6a c
- ISTE Standards for Students: (If video is to be created by students) 1a d, 2c , 3a b c, 4b, 6 b c d
- InTASC Standards for Pre-Service Teachers: 1,3, 5 and 8
These activities engage skills found in these units of the Google Educator Level 1 Training Connection:
- Unit 11: Captivate your class with video
- Find High-Quality Educational Content on YouTube
- Curate Educational Content on YouTube
- Create the Optimal Viewing Experience
- Unit 9: Teach students online skill
Assignment
Choice 1. Create an example of the type of video you would challenge your students to create. Go through the process of making the video pretending that you are a student in your classroom. The content will be based on objectives described in your planned thematic unit.
Choice 2. Create an example of a video that you would use to teach a concept to your students, introduce a project, or give additional information to students who have interest in a particular topic associated with your Thematic Unit. The content will be aligned with objectives from in your planned thematic unit
Specific Video Requirements:
- The video is based on a script and storyboard
- Duration of video is between 1—3 minutes (strictly enforced—you will lose points for shorter or longer videos).
- Visual elements, audio and narration are merged in a logical way to support the concept of the story.
- Editing is evident: Video is a compilation of video clips and/or images (video recorded in one long shot is not sufficient)
- Text (if used) is written with adherence to grammatical rules and to support the flow of the story.
- Content of video is grade-appropriate and accurate.
- Overall quality of video is sufficient to support learning (quality and clarity of images, graphics, video clips and audio).
- The story is told in an economical way - succinct but still meaningful enough to make the point and support learning.
- Use effective Contrast, Alignment, Repetition, and Proximity (C.A.R.P.). Visual design includes choices about colors, fonts, graphics, transitions, and any other visual elements.
- All sources are cited
- Copyright-protected materials are ONLY used in accordance with their individual licensing terms and/or limitations, and these materials are given attribution by clearly citing their source at the end of the video.
- Video is uploaded to YouTube (part of Google apps, see the specific requirements below)
Specific YouTube Studio Requirements:
- Upload completed video to YouTube Studio
- Ensure that your YouTube video is public, not private
- Include the short description explaining the content and the audience for your video
- select category (education) , tags ( ex. 6th grade, science, #unietd...)
- Closed Caption (CC)
Don't create videos that are/have...
- Recorded as one long clip.
- Just "Talking heads" (you standing in front of the camera talking)
- Shot in portrait mode on your phone.
- Copyright-protected materials (basically anything other than your own original work) except when used in accordance with their individual licensing terms or conditions, and these materials are attributed (cited) clearly and accurately at the end of the video. Fair use does not apply to this project.
Plan your work and work to your plan!
From Concept to Product:
Now that you have chosen the type of video from above, it's time to start thinking what information will be included in your video. We are going to follow these steps to create your video.
| A. Preproduction |
B. Production |
C. Post production |
- Define the purpose and the outcome
- Research & plan the project
- Write narrative script
- Create storyboard
- Gather and plan assets (video clips, still images, sound effects, music, etc.)
|
- Record narration
- Create assets, if necessary (record original video, capture images or create personal artwork)
- Assemble assets in video editing software
- Add titles, transitions and special effects
- Give Credits: Cite the sources of your media (images, music, actors..)
|
- Create final output (upload to YouTube)
- Add descriptions, tags, CC
- Make video public
- Reflecting upon learning
|
Note — A script and storyboard should be created BEFORE you begin gathering assets or using any of the technology tools!
A. Preproduction
I CAN Statements
Define the purpose and the outcome of the activity— List the skills that students should improve by completing the video assignment. You will do it in a student-friendly language in a format called I CAN statements that are aligned with the standards/ skills listed in your Thematic Unit Description.
Script
After reviewing the goals and objectives for your thematic unit and generating a rough idea for this project, begin writing a narrative script. Focus! You have only a few minutes to clearly communicate the message, tell a story, and make an impression. The script provides the underlying narrative. The script should take between 1–3 minutes to read at a relatively slow pace. Be prepared to share and discuss your script with a peer.
List of Ideas for Digital Storytelling Across the Curriculum
Storyboard
 Once you have composed a narrative for the digital story, further refine your plan by developing a storyboard. Follow the production process outlined above. The creation of a storyboard is a standard practice employed by creative professionals, and it will make the development process more efficient. Be prepared to share and discuss your storyboard with a peer.
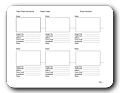
You can download one of the storyboard templates provided below, and print as many pages as necessary to plan your video. You may also use your own template, numbered note cards, or play with the online storyboard creator.
 Storyboard Template 1 and Template 2
File Management
Gather all assets (images, audio, and video clips) in the same folder and keep all related files organized this way in a single folder just for your video project. This allows you to back up your project or move it to another computer, if necessary. Avoid having files related to the project scattered about in different places on your computer. Think how would you replicate this in your classroom. How would you help your students manage their files?
B. Production (Start Recording)
Audio/Video Equipment
You may use your own digital camera or cellphone to take pictures or record short video clips. However, verify that you know how to transfer pictures and video from your device to the computer before you spend too much time capturing original footage. Test this process with your equipment and confirm that things work as expected.
Software and file formats
You can use WeVideo (online), iMovie (Mac), Windows Photos App, or discuss with the instructor other video editing software to create your video. The final project needs to be uploaded to YouTube. So whatever software you choose see if it creates files in a file format that is accepted by YouTube.
Copyright (Give Credits: Cite the sources and creators of your media (images, music, actors..)
As you search for images, audio or video clips, locate the terms of use for any media that you intend to download and use in your project. Any image, audio or video clip taken from a source other than your own is subject to the copyright of its owner. Use copyright firendly resources. Cite the sources and give proper attribution to the owners at the end of your video. Refer to the RWLDs and lecture topic Copyright, Fair Use & Creative Commons for more information. Visit with your instructor if you have additional questions.
C. Post Production
Exporting & Submitting Options
1. It will be your responsibility to find a way to share your project to YouTube. If your project is created in WeVideo you can publish it there then either download to your desktop first or share it directly to YouTube.
2. Ensure that your YouTube video is public, not private. Allow plenty of time for the upload process to complete.
After your video is uploaded to YouTube you will be required to add additional information to the video (description, category, tags, etc. as directed above).
Submission
Now that you have completed your video, it is time to reflect on the process. What were you trying to achieve? How did you approach it? How did your process align with the ISTE standards?
We are asking you to refer to the ISTE Standards for Educators and the ISTE Standards for Students. We are suggesting that you use these ISTE Educators standards (3b, 3c, 5b, 5c, 6a, 6c) or these ISTE Student standards (1a, 1d, 2c, 3a, 3b, 3c, 4b, 6b, 6c, 6d). You can find these on our Standards and Reflections Guidelines page.
For visual learners: Here is a helpful 5 min video created by Dr.Zeitz on how to write the reflections.
In the eLearning assignment submission box submit:
1. Video URL: (Copy and paste the URL from the YouTube address bar).
2. Reflection: (follow the template below)
- Grade level: ___
- Unit Theme: __
- I CAN statements: __
- ISTE-S or ISTE-E Standards Alignment #1 :
- I designed this project to support the indicator # ___from standard #___ , by__ (Explain how you designed your project to address this standard and indicator)
- ISTE-S or ISTE-E Standards Alignment #2 :
- I designed this project to support the indicator # ___from standard #___ , by__ (Explain how you designed your project to address this standard and indicator)
Additional Resources
Project Planning
- Tutorials
- File Conversion Tools
- Image resources
- Video resources
- and audio resources
Point Structure (100 points)
| Criteria |
Points Possible |
Content
- Supports the learning objective as described in the reflection
- Age-appropriate and accurate
- Accurate spelling and grammar
- Duration of video is between 1–3 minutes
- Video is a compilation of audio with short video clips and/or still images
- Narration is present in the form of audio or text
|
30 |
Story Development
- Story clearly follows a narrative script
- Visual elements, audio and narration are merged into the logical way to support the concept of the story
- Story is told in an economical way - succinct but still meaningful enough to make the point and support learning
- Text (if used) are well written and adhere to grammatical rules and supports the flow of the story.
|
20 |
Visual Design Quality and Law Abidance
- Overall quality of video is sufficient to support learning (high quality and clarity of images, video and sounds)
- Transitions, sound and special effects used effectively (they enhance the content rather than detract from it)
- CARP principles applied effectively (includes use of colors, fonts, graphics, transitions, and other visual elements)
- Media follows copyright guidelines; are either self-produced, or are from Creative Commons or Public Domain sources.
- All sources are cited: Copyright-protected materials are ONLY used in accordance with their individual licensing terms and/or limitations, and these materials are given attribution by clearly citing their source.
|
20 |
Assignment Submission and Reflection
- YouTube link is provided
- I CAN statements are provided
- Reflection is written with clarity and depth and follows the Reflection Guidelines
|
15 |
YouTube
- Link is public
- Short description explaining the content and the audience of the video
- Video has assigned category (education) and tags ( ex. 6th grade, science, #unietd...)
- Video has Closed Captions (CC)
|
15 |
File Management
- Video URL and video reflections are correctly submitted in the assignment submission box
|
10% |
Special Notes:
- Remember, you may not use any media under the terms of fair use. Fair use does not apply to this project.
- Allow plenty of time for the video upload process to complete. This may take a long time, depending on your Internet connection.
- Follow the instructions provided in the submission box precisely to avoid losing points on your assignment.